


Hello and Welcome to Photographer Week here on JasmineStarBlog.com! I'm excited to collaborate with fellow peers as they shed light and share industry tips. Today my good pal (and former bride…whoop!) Katelyn James is breaking down why shooting with Kelvin white balance rocks her world!
______________
A sweet photographer at a recent coaching session said “I'm afraid to teach because what if I change my mind about something and then I've taught everyone something that's WRONG?!” Oh I feel ya girl! It's humbling being someone who educates. It's scary to learn new things and then think “Shoot! But I've been teaching something different! gah! Now what?!”. You know what I think? I respect leaders MORE when they can back track and admit that they have found a new way of doing things that works better!
The truth is, I was asked two years ago if I shot in KELVIN White Balance and I said “Oh no, I'm just fine using my “SHADE and CLOUDY” setting!”. Welp, almost immediately after that workshop, I started shooting in Kelvin and it rocked my editing world! So I immediately went into my workshop FB group and made an announcement about my new found love for Kelvin! Is it humbling? SURE! But it's GOOD to be humbled and it's the right thing to do as an educator! If I didn't keep learning, I wouldn't have the right to teach!
So what is KELVIN?! Kelvin is a manual white balance setting on your camera that allows you to manually adjust the temperature setting while you're shooting! Here's why I switched:
1. I wanted more control in-camera!
2. I don't use an expo-disk but I wanted more accuracy!
3. I love warmer images but sometimes “SHADE” was too warm and “CLOUDY” was too cool. I needed an in-between!
4. I wanted to decrease my editing time and keep my images in the purest form possible post processing! (Not having to do drastic color corrections to the raw files)
5. When I shoot with the correct color in-camera, It allows me to focus more on composition while shooting because I'm not distracted by worrying about images being too “orange” or too “blue”!
So do you want to give Kelvin a try?! Here are some things you will want to know!
1. There's a learning curve! If you're REALLY new and you're still trying to figure out manual exposure, maybe wait on the Kelvin setting for now!
2. You can set up a Custom Function to make adjusting Kelvin faster!
3. Learn the scale! You're going to need to memorize that the LOWER the number, the cooler the temperature and the HIGHER the number, the warmer temperature.
4. Be patient! It takes some time to get used to this!
5. Practice with a just-for-fun shoot before trying Kelvin during a paid shoot!
6. Make sure you're shooting in RAW. If you have a whoopsie with your Kelvin settings, your RAW file will be fixable but your JPEG will not. So make sure you're shooting in RAW! …. Always!
7. Set your White Balance setting to “K” and start manually adjusting your temperature setting!
Here's a look a the Kelvin Scale!
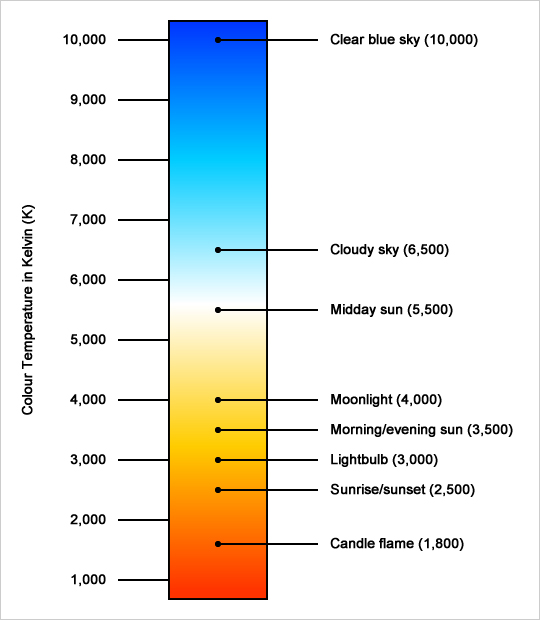
Graphic Credit: ONA HAU PHOTOGRAPHY
LCD screen of Kelvin setting on a Canon Mark III:
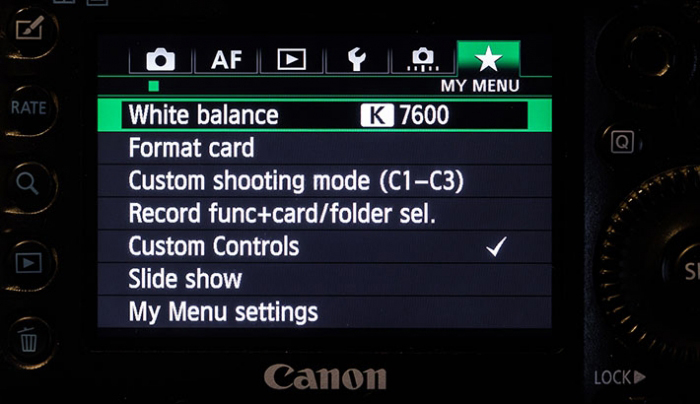
Image Credit: FStoppers
So here's an example of when using Kelvin SAVED me! I ran back to check on the girls before the ceremony and they were praying… in a SUPER dark room with VERY orange lamps (tungsten light) and no windows. I didn't have a flash on me and I needed to shoot it right then. So I adjusted my Kelvin to 2750 and this is straight out of the camera! It's still a little too warm but the color is awesome compared to an “auto” wb setting! :
Settings: Canon 5D Mark III, 50mm 2.2 2500ISO 1/60 WB 2750
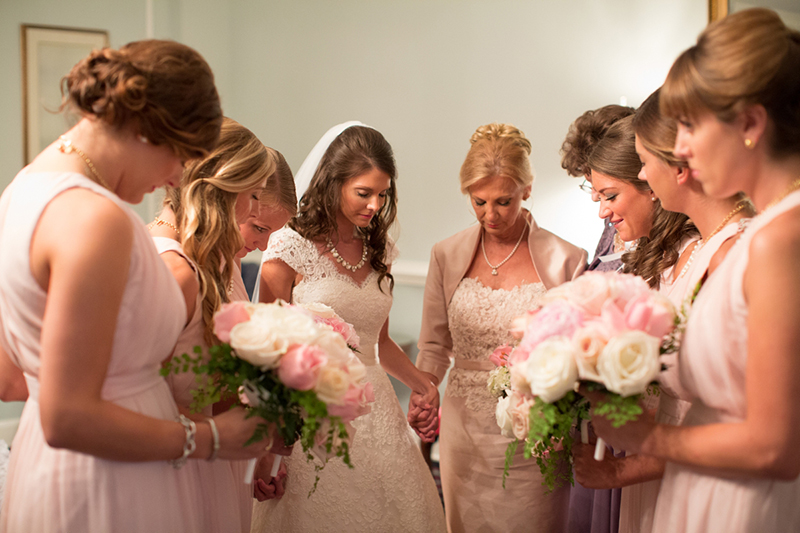
And just because this post needs something PRETTY, here's an image from Saturday's wedding!
Settings: Canon 5D Mark III, 85mm 1.8, 200ISO 1/400 WB 6500

Have you read Monday's post about Sue Bryce's secret to using a white sheet on a photo shoot? Check it out!
")


")